Wedding Seating Chart Guide: Make a Seating Plan Faster
Published March 9, 2026 · Updated September 15, 2026
To create a wedding seating chart, start by laying out your tables, add your guest list, group guests who belong together, flag conflicts, and use an optimizer to propose assignments that you can review. Seatify demonstrates this relationship-aware workflow with sample data in the public demo. Organizer access is limited during the closed beta; the signup page shows the current access path.
This guide shows you how to create a seating chart for a wedding reception, handle family dynamics, and turn a messy guest list into a practical seating arrangement your venue coordinator can use.
Here's exactly how to do it, step by step.
Step 1: Set Up Your Tables
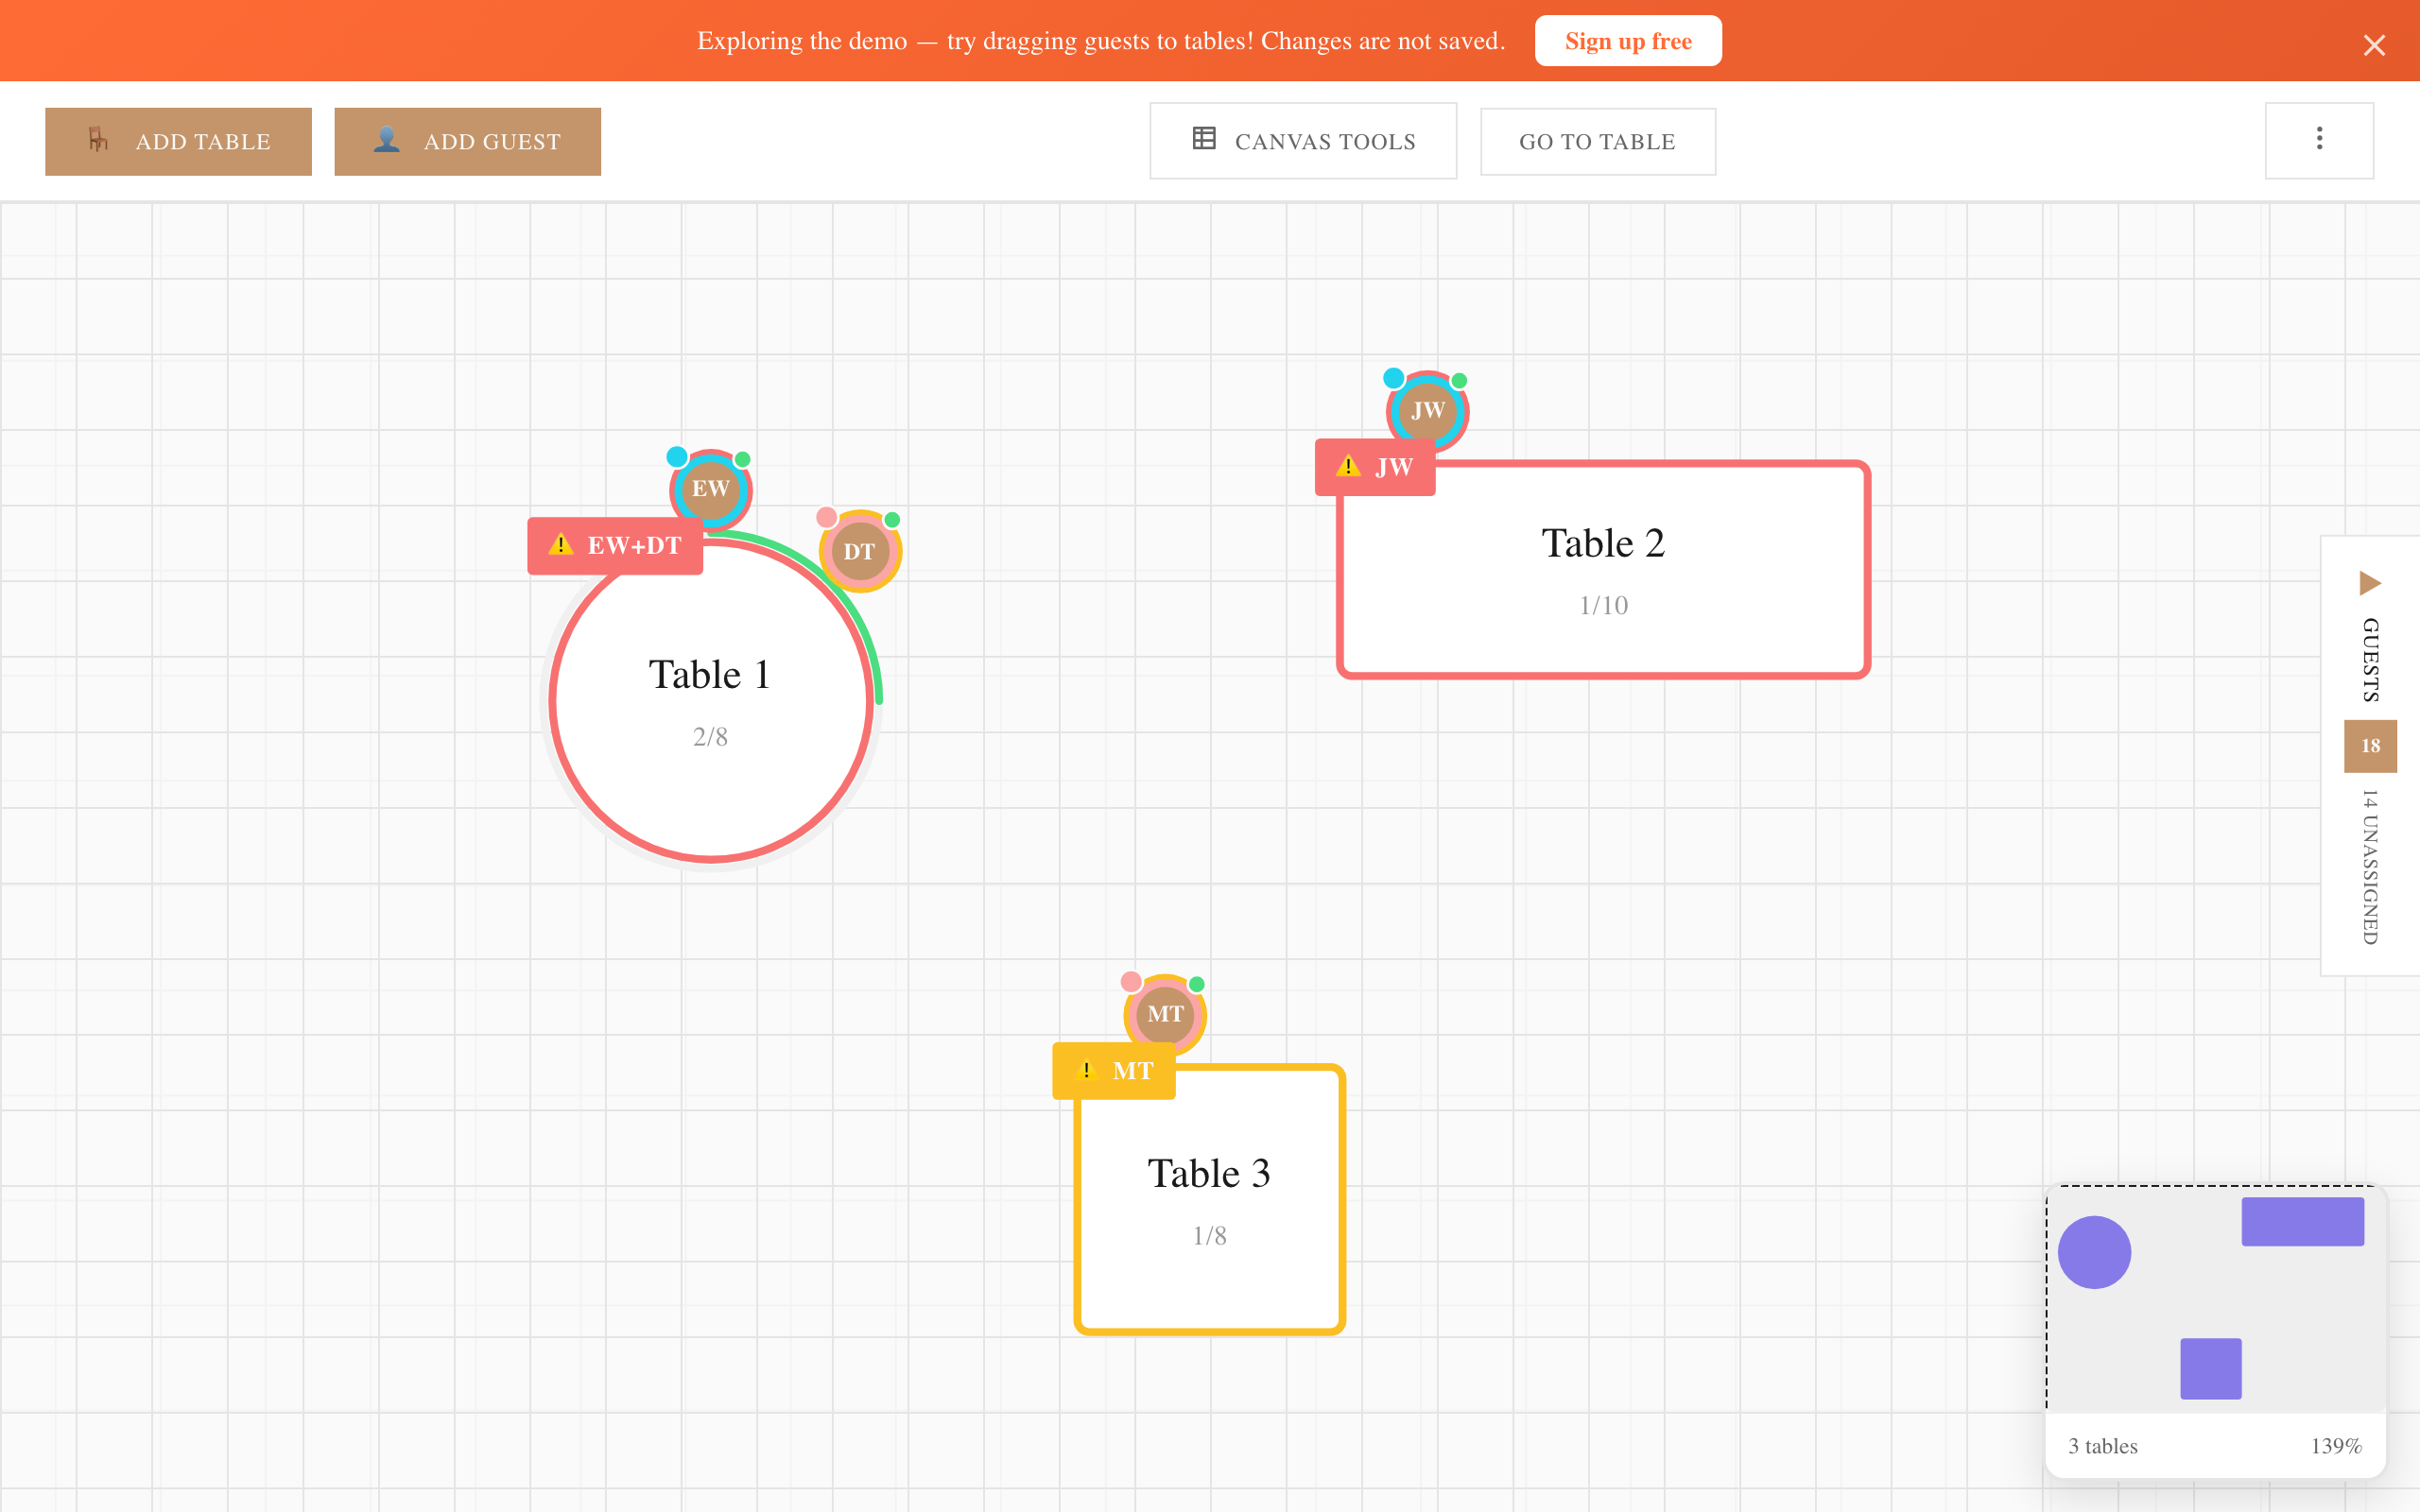
Before you seat anyone, you need to know what you're working with. Start by placing tables on the visual canvas to match your venue's layout. You have three main shapes to choose from:
- Round tables — The classic wedding reception choice. A standard 60-inch round comfortably seats 8 to 10 guests and encourages conversation since everyone faces each other.
- Rectangular tables — Great for long banquet-style setups. An 8-foot rectangular table fits 8 to 10 guests and works well for family-style dinners or more formal arrangements.
- Head tables — Typically reserved for the wedding party, positioned at the front of the room so everyone can see you.
You can mix and match shapes — most receptions do. Drag and drop tables anywhere on the canvas, rotate them to fit your floor plan, and adjust the number of seats at each one. If your venue has provided a layout diagram, you can recreate it in a couple of minutes. Don't worry about getting it perfect right away. You can always rearrange later.
Step 2: Add Your Guest List
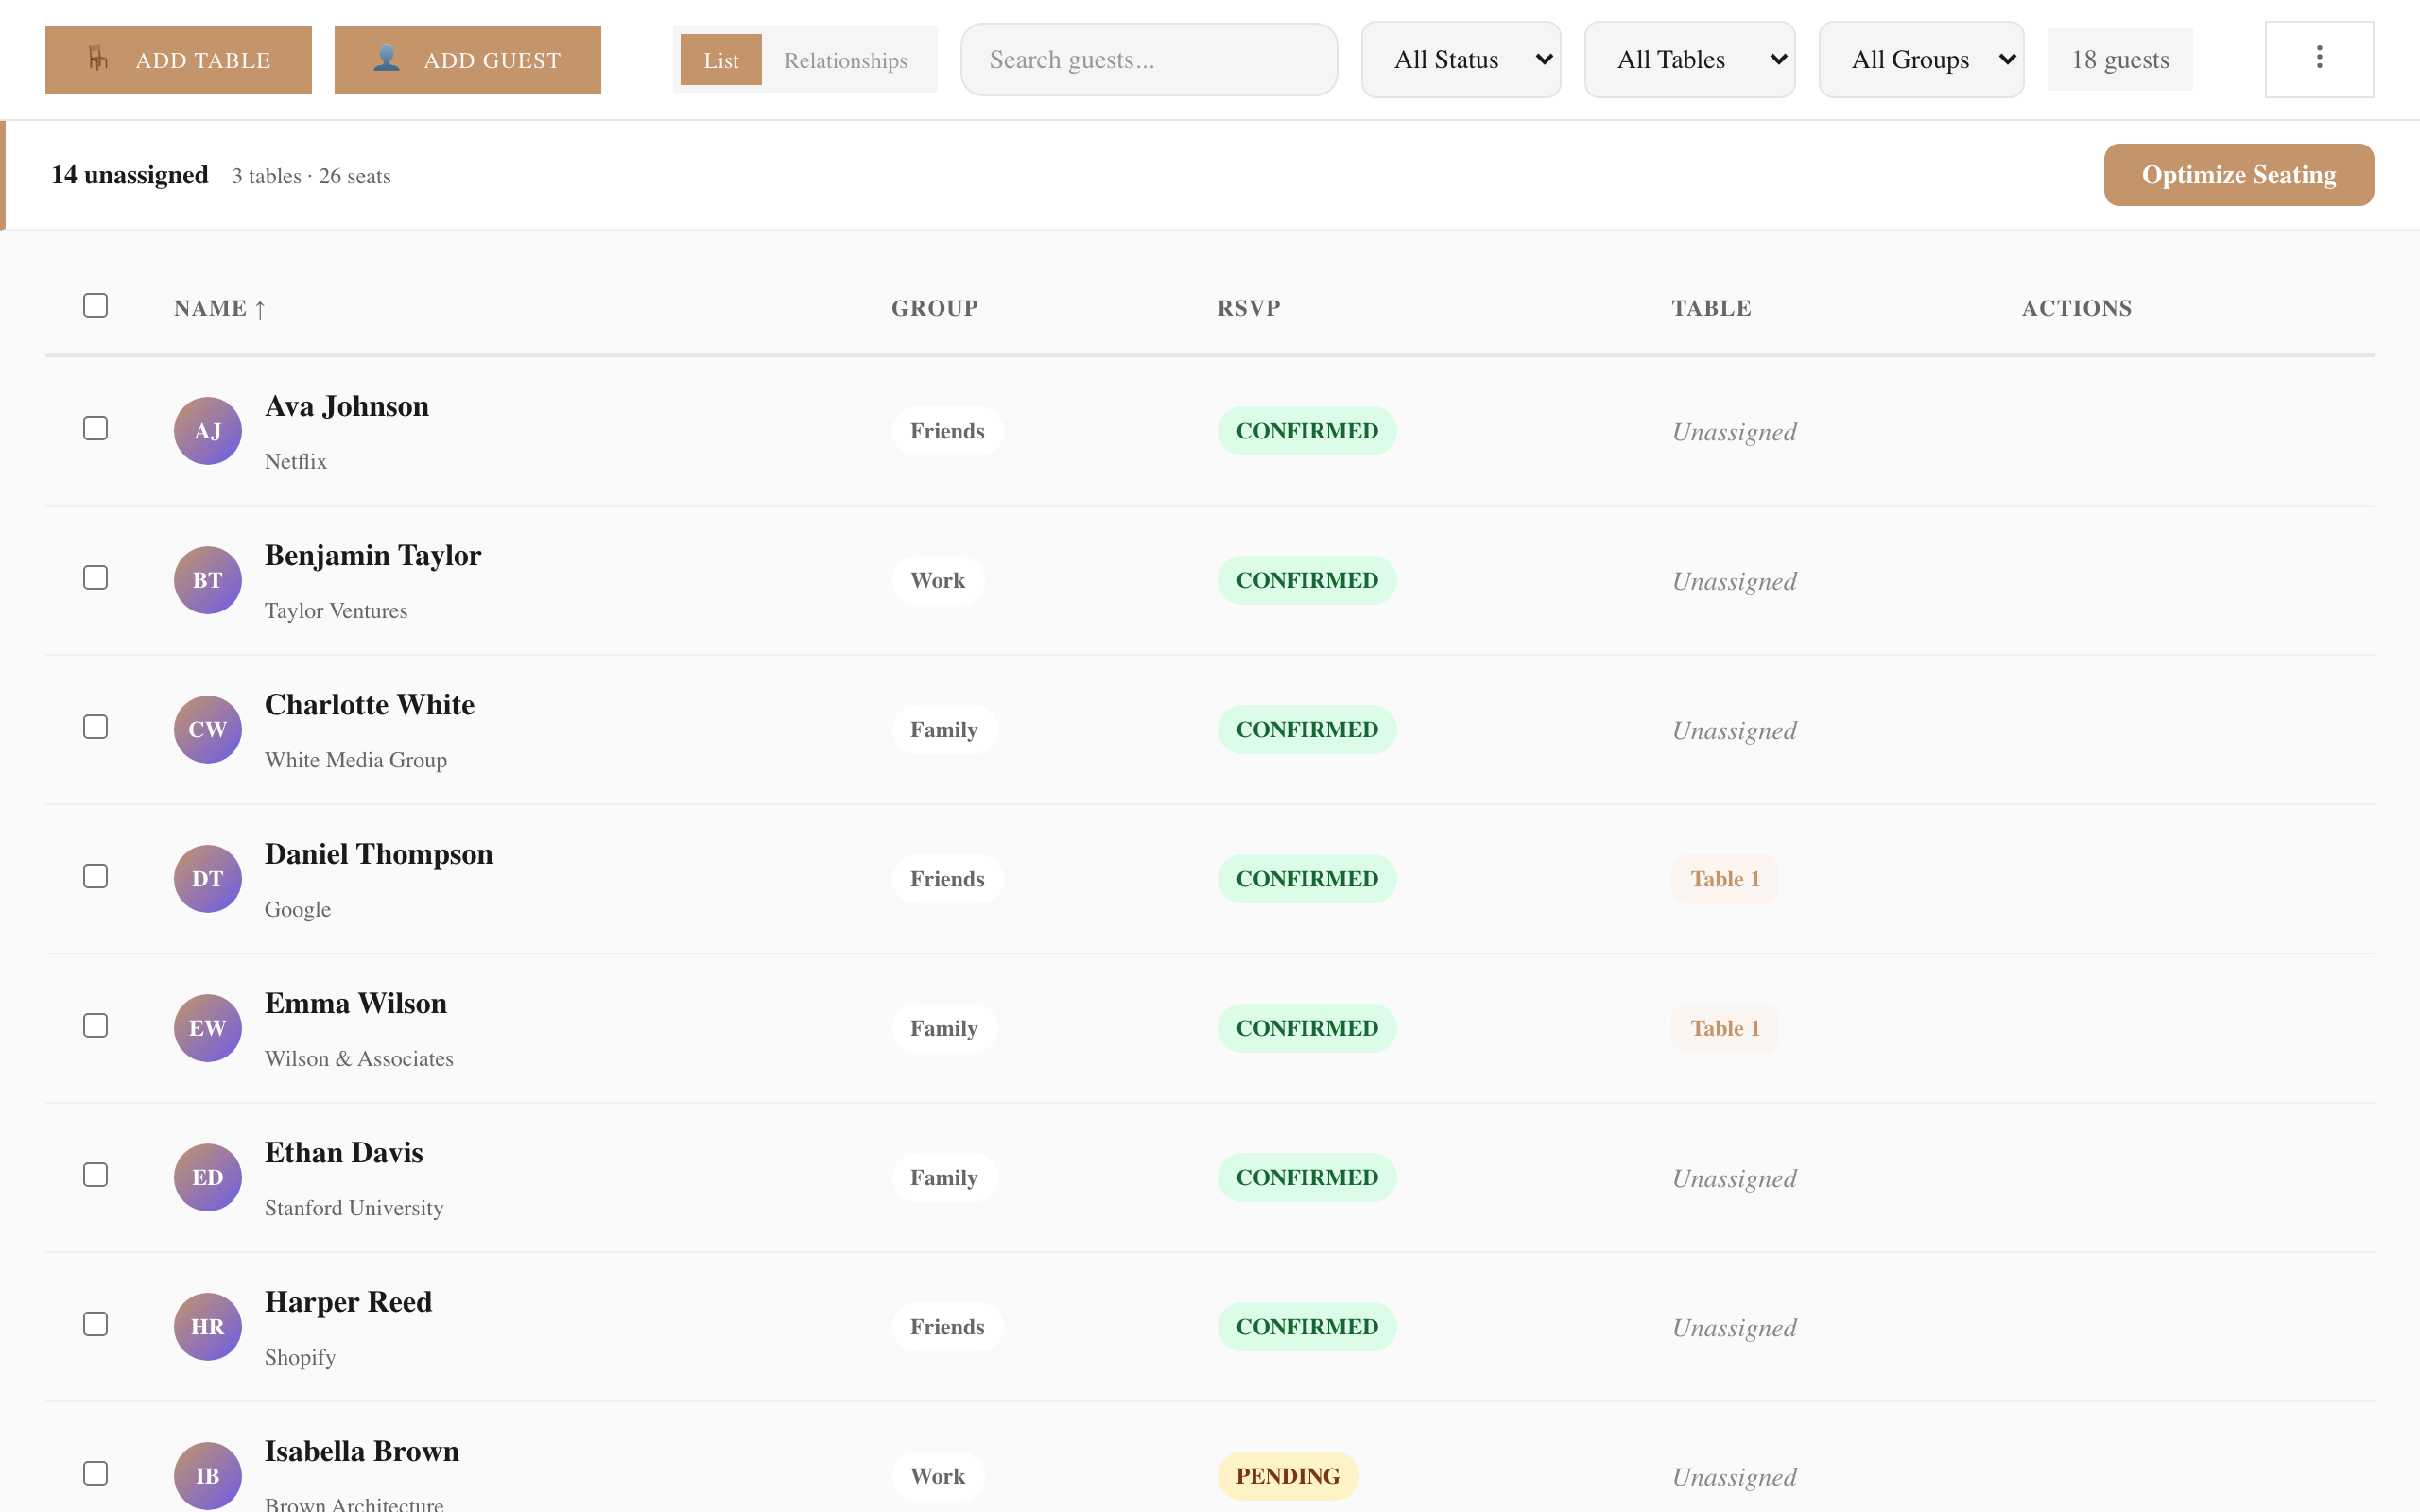
Now for the people. You have two options for getting your guests into the system:
Type them in manually. Just start adding names one by one. This works well if your list is still coming together and you're adding people as RSVPs roll in.
Import from a spreadsheet. If you already have your guest list in Excel or Google Sheets, export it as a CSV and upload it. The import wizard maps your columns automatically — names, email addresses, dietary restrictions, meal preferences, and any notes you've added.
As you add guests, you can tag them with details that matter for seating: dietary needs (vegetarian, gluten-free, nut allergy), meal choices if your caterer requires them, and any notes for yourself ("needs wheelchair-accessible seat," "doesn't drink — skip the wine table").
One thing worth knowing: the public demo uses sample data rather than your guest list. Creating and saving your own event requires an approved beta account.
Step 3: Define Relationships
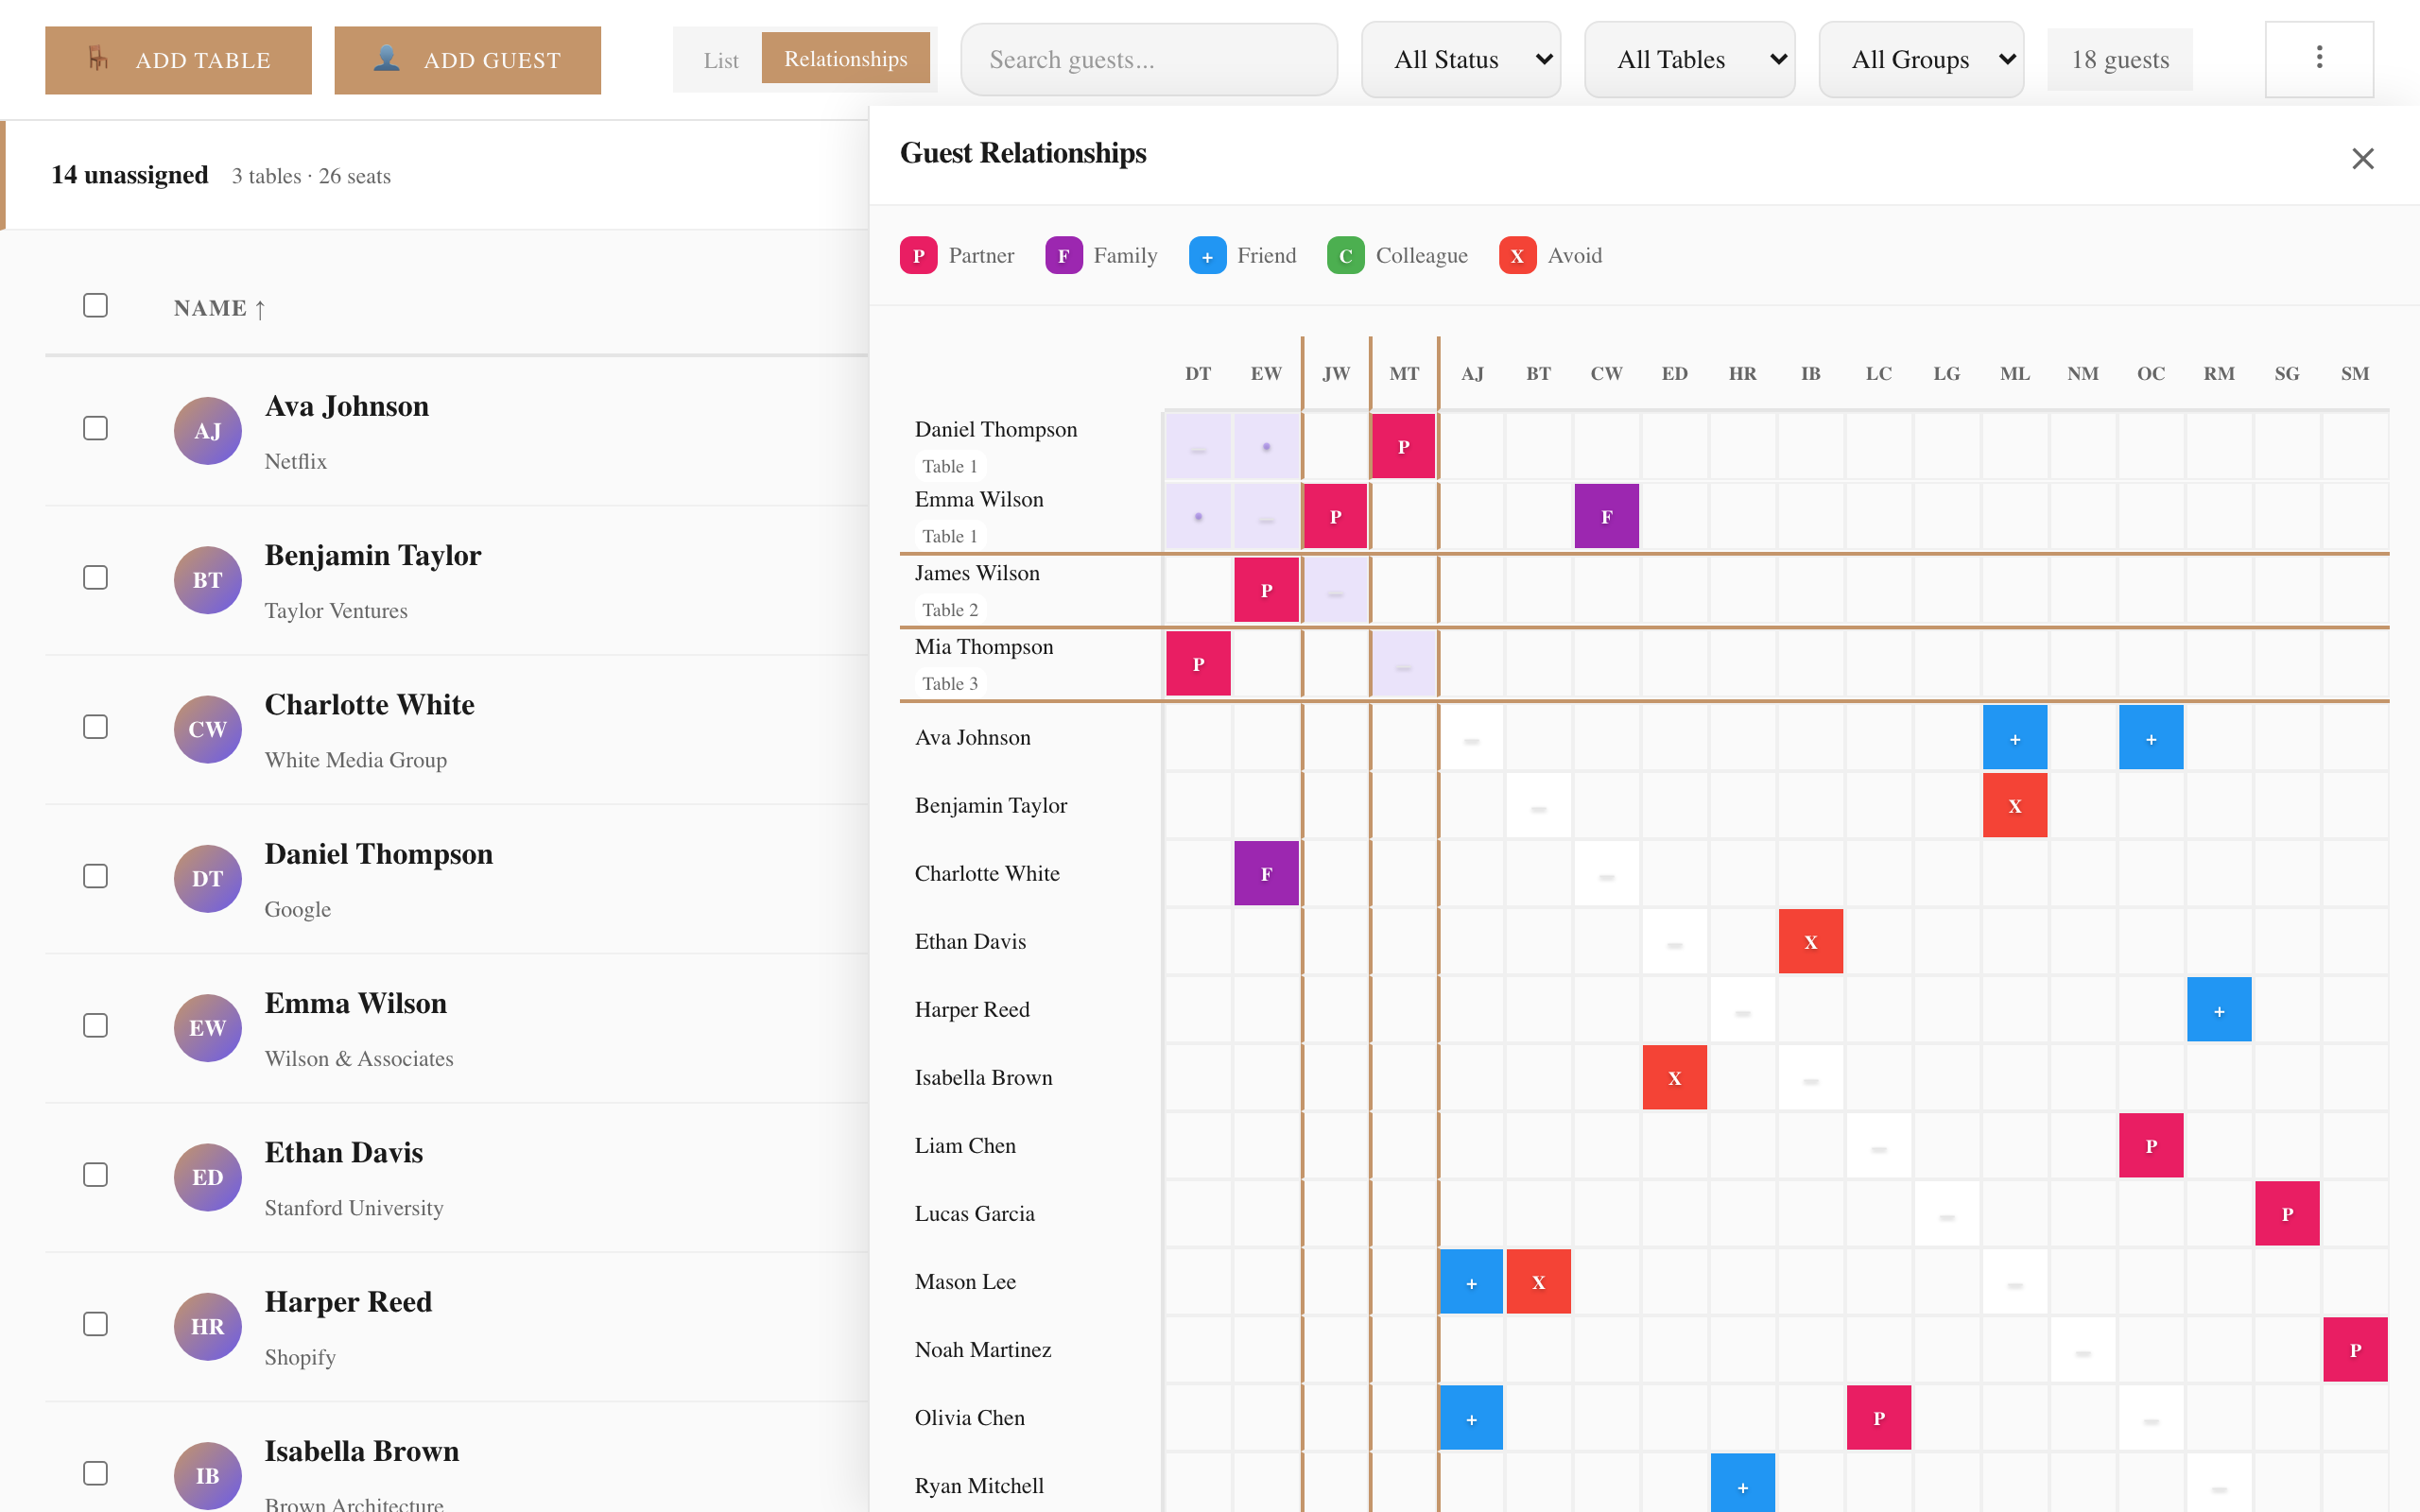
This is where a seating chart maker goes from "nice to have" to "absolute lifesaver." Arranging 100+ guests by hand means holding a dozen invisible rules in your head at once. Defining relationships lets you offload that mental juggling to the software.
There are a few types of relationships you can set up:
Partners — Married couples, engaged pairs, people who came together. Mark them as partners and they'll always be seated side by side. No exceptions.
Family groups — The Johnsons, the Garcias, your mom's side of the family. Group them so they end up at the same table or adjacent tables.
Friend clusters — Your college roommates, your coworkers, your Saturday hiking group. People who already know each other and will have a better time sitting together.
"Keep apart" pairs — This is the one that saves the most drama. Mark your divorced parents as a "keep apart" pair so they end up on opposite sides of the room. Flag the two cousins who got into it at Thanksgiving so there's a buffer of several tables between them. Note the ex who's coming as a plus-one so they're nowhere near your maid of honor.
Real examples help here. Say your Uncle Rick and Aunt Linda split up last year — mark them as "keep apart" and you won't accidentally seat them across from each other during toasts. Or group your college friends together so they have people to talk to instead of sitting in awkward silence next to your partner's work colleagues.
You don't need to define relationships for every single guest. Focus on the ones that matter: couples, known conflicts, and friend groups. The optimizer handles the rest.
Step 4: Run the Optimizer
This is the step that saves you hours. Once your tables are placed, your guests are added, and your relationships are defined, click the optimize button.
In Seatify's demonstrated workflow, the optimizer proposes assignments for unassigned guests using relationship and capacity inputs. Treat the result as a draft to review, not a guarantee that every preference can be satisfied.
Behind the scenes, the optimizer scores candidate arrangements based on the constraints and preferences you provide. Hard and soft rules can conflict, which is why the review step matters.
The public demo is the appropriate place to inspect the approach before requesting access. Actual performance depends on the event and enabled beta capabilities.
Step 5: Fine-Tune and Export
The optimizer gives you a strong starting point, but you know your guests better than any algorithm. After it runs, take a few minutes to review the results and make adjustments. Drag guests between tables if you spot something that doesn't feel right. Maybe you want your photographer friend near the dance floor, or your grandparents closer to the exit for easy access.
For approved beta accounts with the relevant capabilities enabled, the intended sharing workflow includes:
- Export to PDF — A clean, printable layout you can hand to your venue coordinator or wedding planner. It shows every table with its assigned guests.
- Share a link — Send a direct URL to anyone who needs to see the chart. Great for co-planners, your wedding party, or your day-of coordinator.
- Generate a QR code — Print it and place it at the welcome table so guests can pull up the seating chart on their phones when they arrive.
During beta, capability availability can vary. Confirm that the export or sharing path you need is enabled before relying on it for an event. Learn more on the how it works page.
If you are comparing tools before you start, use the wedding seating chart generator overview, the simpler seating chart maker page, or the seating plan generator guide to pick the workflow that matches your planning stage.
Pro Tips for Wedding Seating
A few things we've learned from couples who have planned their seating arrangements with Seatify:
Start 2 to 3 weeks before the wedding, but expect changes. Don't wait until the last minute, but don't finalize too early either. RSVPs trickle in, plus-ones get added, plans change. Give yourself a window to adjust without stress.
Leave a buffer at a few tables. Keep 1 to 2 empty seats at 3 or 4 tables scattered around the room. When your cousin texts the day before saying she's bringing her new boyfriend, you'll have a spot ready without reshuffling everything.
Create a kids' table (or two). Group children ages 5 to 12 together and make sure at least one responsible, patient adult is seated nearby. Kids are happier with other kids, and the adults at surrounding tables will thank you.
Consider a sweetheart table. The traditional head table with the entire wedding party is increasingly being replaced by a sweetheart table — just the couple, front and center. Your bridal party sits with their own partners and friends, and you get a moment to breathe and enjoy the reception together.
Use the "connector" trick. At every table where guests don't know many people, seat one outgoing, social person who can carry a conversation and make introductions. You know who these people are in your life — put them to work.
If you're still in the early stages of planning your reception layout, check out the wedding seating page for more ideas on table arrangements and floor plans.
Want to see the optimizer before building your own chart? Try the interactive demo, then review current closed-beta access when you're ready to use Seatify for your guest list.
Frequently Asked Questions
Is Seatify free and generally available?
Not yet. Seatify is in closed beta. A planned Starter configuration currently uses limits of up to 10 events and 200 guests per event, but those limits are not a generally available public-plan promise.
Do I need to create an account?
The sample-data demo is public. Creating and managing your own event requires approved beta access; the signup page shows the current access path.
Can I import my guest list from a spreadsheet?
Approved beta organizers can import supported CSV files when the import capability is enabled. Review the mapped fields before saving; automatic mapping should not be treated as infallible.
What if an RSVP changes last minute?
Update the guest list, re-run the optimizer if appropriate, and review the changed assignments. Do not assume a re-run will preserve every previous placement unless you have explicitly constrained it.
Can I share the seating chart with my venue?
Export and sharing are beta capabilities. If they are enabled for your approved account, verify the generated artifact or link before handing it to a venue or guests.
Ready to plan your event?
Seatify is in private beta. Join the early-access waitlist to request organizer access. Preview intelligent seating workflows for weddings, galas, and corporate events with sample data.
Join the Early-Access Waitlist